Monday, 30 May 2016

DIY - Ice Pops

Seeing as the weather has been lovely this bank holiday weekend, I've decided to write a post about ice pops (freeze pops?). This is really easy and (sshhhh) can be healthy too.....


Smoothie and Lemonade Ice Pops


You will need:
  • Zipzicle ice pop molds (one pack has 18 bags)
  • A selection of fruit, yogurt, juice, coconut water, lemonade/ginger beer/Prosecco/anything!
  • Funnel
  • Jug
  • Blender
I made two versions:


I blitzed some strawberries, raspberries, natural low fat yogurt in one batch and then strawberries and lemonade in another.
Pour the smoothies/juice into a jug and, using a funnel, pour up to the fill line on the zip lock bag. The benefit of these Zipzicle bags is that you don't have to wash them afterwards - yay!
Freeze overnight and enjoy in the sun :)


Good presentation skills.....


Friday, 22 April 2016

10 minute DIY

Here is a quick and simple DIY that you can do in 10 minutes!


Tattoo Decorated Glass


You will need:
  • An old jar/glass candle holder (mine is an old Nutella jar - of course!)
  • Temporary tattoos - mine are from MeriMeri 
  • A cloth/kitchen paper
  • Clear varnish/ModPodge
First of all, ensure your container is clean and dry - rubbing alcohol wipes are great for this.


Follow the tattoo instructions and apply them to your glass as you would to your skin - this normally involves peeling off the backing, applying the tattoo to the surface and dabbing it with a wet cloth. This will take about 30 seconds.


Slowly remove the backing paper and dab off any water gently with kitchen paper.


To protect the design, apply some matte varnish, ModPodge or similar with a small paint brush.


I wouldn't recommend popping it into the dishwasher but may be okay if gently hand washed. These are ideal as small vases and tealight holders :)


Have a great weekend :)

Sunday, 17 April 2016

Customising with Heat n Bond

Another great little product I’ve tried out is the ‘Heat n Bond’ iron-on ultra hold adhesive.

'No sew’ tutorials suggest using an adhesive of some kind – I’m not keen on using hot glue as it’s messy and, erm, hot, but this non-sticky paper adhesive is great especially if you’re not confident at sewing. 
If you go ahead and buy Heat n Bond, be careful when you open the packaging – don’t just rip it open like I did as the instructions on how to use it are on there! Just snip the top off :)

Here is just one idea for its use:

Customised Canvas Bag

For this diy, you will need...
  • A canvas bag
  • Heat n Bond
  • Scissors
  • Fabric
  • Pencil
  • Iron
1. Pre-wash all materials without fabric softener (if using clothing) - with a canvas bag, I wouldn't bother (I found it made the bag crumple and go deformed)
2. Pre-heat your iron to about a medium setting (no steam) - place the adhesive side of the Heat n Bond onto the back of your fabric (paper liner should be facing up as you'll need to draw on this side)


3. Place and hold your iron on the paper for a few seconds - repeat all over your fabric until bonded. Allow to cool (this won't take long)


4. Draw the shape desired with a pencil and cut


5. Decide where you want to place your shapes and peel off the paper backing - press and hold the iron for about 8 seconds on each section until bonded to the bag (this may take longer with a thicker fabric)


And there you have it - a customised canvas bag. If you want to use Heat n Bond on clothing, buy Heat n Bond Lite and use a sewing machine's "zigzag" setting to sew around the edge.

Happy Sunday guys :)

Saturday, 12 March 2016

Let's talk about....meringues

I have to admit, I'm not a meringue expert. I've only made meringues to be used in a pavlova maybe a few times but when I have made the meringue mixture, I've never really experienced any problems. This why I think it is a fantastic and impressive dessert. Here are a few positives:
  • They look great
  • They are easy to shape/manipulate into nests/pavlova layers
  • Easy to colour:

Lucy's mini rainbow meringues

  • Easy to decorate
  • Minimal effort - it may be a long bake, but the most difficult bit is separating some eggs
  • If they are slightly undercooked, they're still yummy and you can hide it with loads of double cream
  • The back up plan - if it all goes wrong, you can buy meringue nests
...and that's all before you eat them!


So some tips:
  • Whisking - I've always used a mixer and I've never done it by hand. You can control your mix and keep going if you aren't achieving those stiff peaks!
  • Some swear by warming up the caster sugar in the over first, making a more glossy meringue
  • Don't be scared to be spectacular (ha!) - pop some of the mix in a piping bag and do something fancy - the mix is easy to control and looks good
  • Don't rush - concentrate on getting those egg whites and if you need some egg separating practice, load up Cooking Mama into your Nintendo DS ;)
  • Remove any egg shells - this is easily done with wet fingers
  • Make sure your mixing bowl is clean and dry
  • Start mixing slowly until bubbles start to form then pop it onto full blast
  • Mix until the egg whites 'stick' to your whisk
  • Feel the mixture between your fingers - you don't want it to be grainy - if it is, keep mixing
As for the egg yolks, you could always make mayonnaise or glaze a pie (guess which one I did) ;)


Here's a recipe I followed recently, where I changed the filling slightly - original recipe is available here


Crown Layered Pavlova


  • 6 free-range egg whites
  • pinch salt
  • 350g/12oz caster sugar
  • 2 tsp cornflour
  • 1 tsp white wine vinegar

For the filling
  • 600ml double cream whipped into soft peaks
  • 3 passion fruits
  • Strawberries, blackberries, raspberries


Method


Preheat the oven to 180C/350F/Gas 4.
Draw two 20cm/8in circles and a 15cm/6in circle on greaseproof paper and place onto three separate baking trays.
Whisk the egg whites and salt in a large clean dry bowl until they form soft peaks when the whisk is removed. Slowly whisk in the sugar and continue to whisk until the egg whites are stiff and glossy. Whisk in the cornflour and vinegar.
Spoon one-third of the mixture onto one of the 20cm/8in circles. Spoon another third onto the other 20cm/8in circle.
Spoon half of the remaining mixture onto the 15cm/6in circle. Pipe the remaining meringue around the edge of the 15cm/6in circle in a crown shape.
Reduce the oven to 140C/275F/Gas 1 and bake the meringues for 1-1¼ hours, or until the meringue is crisp outside, but feels soft yet set inside. (If you notice that the different meringues are not cooking evenly, swap the shelves.) Switch off the oven and leave the meringue to cool down in the oven.


To assemble the pavlova, carefully peel the greaseproof paper off the bottom of the meringues. Place a 20cm/8in meringue onto a large, flat serving plate. Once you have whipped your cream, mix in the passion fruit into it. Spread the double cream onto each layer, topping with the soft fruits (saving your best looking ones for the top). Finish by placing one meringue on top of each other.


Taaa daaaa!


For further tips and inspiration, have a look on YouTube or search for the Meringue Girls on Instagram.


Lowri, and guest meringue expert, Lucy xx


Saturday, 27 February 2016

Water Slide Decal Paper Candle - DIY

This is a great little DIY before Mother's Day but it can be used for so many gifts, wedding favours etc.

Water slide decal paper is brilliant - slightly fiddly but when you get it right, it looks great.

I bought a pack of 20 sheets from Amazon - WARNING - make sure you buy the correct type for your printer (i.e. laser or ink jet) and I recommend getting the 'clear' paper as you don't have to worry about a white background/border around your pictures.

Decorating a Candle


You will need....
  • A candle (!) - any plain pillar candle, any size you like
  • A printer
  • Scissors
  • A bowl of water
  • Kitchen roll/dry cloth
First of all, decide on what design you want to put on your candle - there are millions of free artwork sites/free downloadables out there. If you want to be super clever, scan a photo or a drawing done by a little 'un and resize it to fit your candle. One image I used was a free printable from here

I'd advise printing on regular paper first before inserting the decal paper into the printer.

Once you are happy with the image and its size, print onto the shiny side of the decal paper.

Cut around your design and submerge into water for about 30 seconds for the backing paper to start to slip away from your decal. 


With the backing still on, start to slip away the design onto your surface. Be careful as it is delicate and rips easily. Position the decal then gently smooth out any water left under it and gently dab it dry with a cloth.


Leave it overnight before handling. 

According to my instructions, if you use the decal paper on ceramics, you can pop them in the oven to harden (although this doesn't make it dishwasher safe).

And there you go! A personalised candle. As I mentioned earlier, the paper is very versatile and works really well on glass and ceramics.


And finally, big up to Anne who used it on The Great Interior Design Challenge this week! If you haven't watched this yet, get onto iPlayer now!

Lowri xx

Friday, 12 February 2016

Hearts are not just for Valentine's Day

This is a great little DIY and it is not just for Valentine's Day - but seeing as it's heart shaped, I thought now would be a good time to post it.


Danish Heart Ornament

I first made one of these last year - they're simple to make and the weaving is the only fiddly bit. You can make these from thin cardboard or any robust fabric but I think contrasting felt works really well. They make very cute Christmas tree decorations too. Yes I've mentioned Christmas IN February.

Anyway, let's get on with it...you will need:
  • Felt, two contrasting colours
  • Scissors
  • Pins
  • Printed template (there are plenty online, just search for 'Danish Heart')

First of all you need to print this template and cut out one of the long ovals.


Pin the template to one piece of felt and cut around the edge - take your time to cut it well as this will be half of the heart.
Repeat with the other colour of felt.


Fold the felt pieces and carefully cut the slits - they need to be as even as possible - I was pleased with the purple felt more so than the cream, as the sides are too wide, but anyway....

You then need to weave the two pieces into a heart - here is a great diagram and works not matter how many slits are cut into the felt. Just ensure that the colours alternate.

Et voila!


Here's one a made exactly a year ago - this was a second attempt and I sewed around the edges to keep the pieces in place. Also, I stuck on a little message (permanent ink stamped onto calico).


Have a good weekend xx <3

Sunday, 7 February 2016

Weekend Drinks

Here are two drinks recipes - perhaps one more suitable for Friday/Saturday night and maybe the other one for Sunday night....? :)

Bloody Mary

This is a great cocktail to make at home as you need some store cupboard ingredients - chances are when you have it anywhere else, it won't be that great and will literally just consist of vodka and tomato juice. But there's so much more to it than that....

  • Ice
  • 75ml Vodka
  • 2 tbsp lemon juice (bottled is fine if you haven't got lemons)
  • 1 tsp Worcester sauce
  • Dash of Tabasco or to taste
  • 1/4 tsp celery salt
  • 150ml tomato juice
  • Dash of red wine

Put the ice, vodka, lemon juice, Worcester sauce, Tabasco and celery salt in a tall glass and stir a little. 


Add the tomato juice and give it another stir. Add the red wine. Drink!

Flamingo optional

You can chop and change different elements of this recipe - A Beautiful Mess have some great ideas such as using Jalapeños. 

Vanilla Chai

Here is a great recipe I picked up from one of my favourite YouTube-rs Estee Lalonde.
The recipe can be found on the old version of her website - click here. Here is the recipe as she describes on her video.


  • 2 cups of water
  • 2 peppercorns
  • 2 cardamon pods
  • 1 cinnamon stick
  • 1/4 tsp ginger
  • 1/4 tsp nutmeg
  • 2 tea bags - you can use decaf if you prefer
  • 1 tsp brown sugar
  • 1 tsp vanilla
  • Milk
Combine the first six ingredients and simmer for a few minutes. 


Take off the heat and add the brown sugar (sweetener works fine too), vanilla and tea bags to stew (length of time depends on how strong you like your tea - but about 2 minutes).

Strain into your mug and add the milk.


Again, you could make this into a latte, by heating up the milk beforehand and then using a milk frother before adding the tea.

If you'd like more drink-related posts let me know in the comments!
L xx


Saturday, 30 January 2016

Rocky Road

One thing I've never made is Rocky Road - I've no idea why because it is very easy to make and requires no oven. Then I saw Jane's Patisserie post a photo on Instagram and I thought I had to make some.

Jane's Patisserie has lots of very yummy recipes - I've previously made the Millionaire's Shortbread which you top with Malteesers. 

The recipe for the Rocky Road is here - I used a microwave to melt the chocolate, butter and golden syrup as it was really quick and just as effective as a bain-marie. 

My first batch wasn't as successful as my second as I was cooking a curry at the same time and was probably maxing out my multi tasking abilities too much. I think I overheated the chocolate/syrup/butter mix which resulted in it thickening and it was difficult to mix with the dry ingredients. I halved the ingredients for the second batch, used a microwave and had no issues. Definitely focus on one thing at a time when making anything!

Yuuummmmmm

Do check out Jane's site - endless amount of deliciousness xx


Monday, 25 January 2016

Dydd Santes Dwynwen - Heart Bookmark DIY

In honour of Dydd Santes Dwynwen, I decided to make a quick DIY - the heart bookmark I made is a little big (I used a 15cmx15cm piece of paper) so reduce according to the size of the book.

Here's one I made earlier :)


I used this video for the instructions. I recommend using paper/thin cardboard which is coloured/patterned on both sides.


I'll be following this up with some Valentine's Day DIYs ....coming soon x

Sunday, 24 January 2016

Something Old, Something New

It's fun to bake something new and to experiment, but it is also great to find a recipe that just works - one of those effortless but yummy bakes.

Here are two examples - one tried and tested cookie recipe, one new muffin recipe:

Nigella's Chocolate Chip Cookies

The recipe is available here but I've altered it slightly to make it even more accessible:
  • It states you should use 1 egg yolk and 1 egg - I just throw both eggs in whole as it is a waste of an egg white and only makes the dough slightly wetter - be cautious if you're using large eggs though
  • Use fridge cold eggs - my eggs are never from the fridge when I've made these
The best bit about cookies is you can add pretty much anything you like - Easter egg chocolate, nuts, Reese's Pieces.....


Coffee and cookies


Dan Lepard's Clementine and Oat Muffins

This recipe was from Lepard's book "Short and Sweet" which I'm currently working my way through. Plenty of practical tips - I found the introduction to the bread section really interesting and the ingredients are pretentious. 

Here is the recipe.

These muffins were easy to make - whisking them for 3-4mins at the start really helped them rise in the oven and for once I did sieve my dry ingredients. Also, we have lots of clementines in the fruit bowl at the moment.


Mmmmmm......

Happy baking :)


Thursday, 21 January 2016

DIY - Tie Dye Infinity Scarf

I've experimented a lot with tie-dye and dyeing clothes in general. Tie-dye generally works very well - it is really satisfying unravelling your work and seeing which patterns you've created.
Sometimes it hasn't always gone to plan - I once dyed my jeans black (they'd turned grey after being washed thousands of times) and I kept finding black dye in the washing machine for weeks afterwards.


This sounds like another one of my silly tips but it is so important to follow the instructions on the packet of dye. Other than that, go wild.

Another tip is do the dyeing either outside or in the garage - basically anywhere you don't mind the odd drip of dye going. An old bit of carpet or an old rug is ideal.


Tie-dye Infinity Scarf

You will need...
  • A packet of dye - I used Dylon's intense violet
  • An infinity scarf - mine is a white jersey scarf from eBay and was about £5
  • Disposable gloves or marigolds
  • Measuring jug
  • Plenty of washing up bowls/plastic boxes
  • Salt 
The dye and scarf....and a sheep (optional)

Firstly I washed my scarf as per the Dylon instructions - I popped it into the washing machine but I'm sure you could hand wash it.

Meanwhile, I stirred the dye with some warm water - the photo below shows me using a saucepan - I didn't actually heat it on the hob, the saucepan was just useful to pour the mix into the water later.

Swirly dye


I then poured warm water into a plastic tub and added the salt (from memory, it was about 6litres of water and 5tbsp of salt)

Salt bath

The dye/water mix is added to the salt/water mix and you are almost ready.

This is the fun bit - add elastic bands, wrap marbles, whatever you want to create your tie-dye pattern. Initially I wrapped the scarf around a piece of wood as I wanted to create a grid pattern - however once wrapped around the wood, it was too big to dip into the plastic tub that contained the dye. 

Nice pattern, shame it won't fit, duh

I decided to tie the scarf randomly with elastic bands instead. Into the dye it goes for approximately an hour.

The scarf submurged in the dye 

According to the instructions, you then need to rinse in cold water and then in warm water. Again, if you want to be on the safe side, fill up another washing bowl/tub with clean water to do the rinsing. I then hung the scarf on the washing line to dry. 
The results are interesting - you never know what it's going to look like. 

Different sides of the scarf

Happy experimenting! X

Friday, 15 January 2016

DIY - Box Frame Art

This is so easy and inexpensive, anyone can do it. You can personalise what you put in the frame according to the room and best of all you can change it whenever you want. I've have three examples here, but the possibilities are endless...

Home Sweet Home

This one is a great house-warming gift - the supplies I used were...
  • Gold Glitter Alphabet Stickers - I used these but you can cheaper/smaller/non glitter alternatives (non glitter - who'd want those?!)
  • A box frame - mine is from Asda and was about £3 and came with a mount
  • Patterned paper - mine are from Mollie Makes
  • Plain cardboard
  • A ruler, scissors, pencil and craft knife
I cut the paper to match the inside of the frame where the photo would normally be and then I started to work out where the letters should go. Using a ruler and pencil enabled me to space out the letters in a consistent way and ensure it was straight.


Once the letters were all stuck, I traced a house shape onto some tracing paper, transferring the house onto the paper and cutting out with a craft knife and ruler. I then placed contrasting cardboard behind it. 

Scrabble Tiles

These also require a box frame (ensure the depth of the frame will allow space for the tiles) . I used E6000 glue to stick the tiles in place. The wooden Scrabble tiles would look good too.

Ice Cream paper from Mollie Makes

Remember My Space? No me either...


Patterned/Text Paper

With this example, you can just cut it to size and stick it in the frame :)

Mollie Makes paper


Sunday, 10 January 2016

Healthy Breakfast

I'm trying out new foods to have for breakfast - ideally healthier options - and I wanted to try out pancakes because (a) I love pancakes and.....well that's it really.

I saw that a lot of people I follow on Twitter made banana pancakes and substituted the flour with oats. Pancakes sounded far more exciting that porridge so here is my attempt...

The recipe I used is from this website:

2 bananas
2 eggs
1/2 cup of rolled oats
1/2 teaspoon of baking powder
pinch of salt
maple syrup, fresh fruit (optional, to serve)

First of all, you put the first 5 ingredients in a blender, until you get a smoothish batter

I freeze bananas that no one wants to eat anymore -
just put them in freezer bags in pairs - good for baking

You then need to leave the batter for 10-20mins so that it thickens slightly.
Blended banana gloop
You then fry them - they seemed a bit more sticky than normal pancake mix and harder to flip over.

Oh, did I mention they tasted horrible?


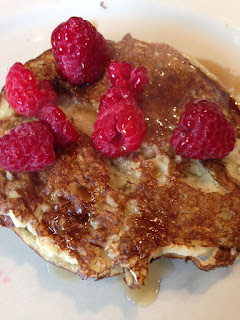
I still ate them - my bananas pancakes with
maple syrup and raspberries

I think I'd rather just eat normal pancakes as a treat rather than attempt this again but if you can recommend a good variation, let me know.
But for now, back to the Special K.

Saturday, 9 January 2016

What I've learnt about.....making your own candles

I'm trying to come up with regular themes for my posts - rather than revisit old ground, I thought I'd write up some things I've learnt from various DIYs.

This first post is about candles - which make great little gifts and you can personalise the look and smell quite easily. But, it can be messy and more expensive than going out and buying one for as little as £1. Here's what I've learnt along the way...


  • Preparation is key - you need the right supplies and to be all set up before melting your wax. Trust me, it'll turn out better this way. Glue your wick in place with strong glue/hot glue and leave it to dry otherwise the hot wax will make it float and move around
  • Smaller new or recycled glass votives work well as you don't need lots of wax and good for practice - a really good shape and size is a 200g Nutella jar - for £1.50 you get a jar for your candle and something for your toast :)
Wax candle in a Nutella jar with cake sprinkles

  • Crayon candles - the don't work! I've seen many tutorials on this method and yes it does colour the wax really well but when I've used this method, the candle doesn't burn. Also, the tutorial recommended melting the wax crayons in a paper cup in the microwave - in my microwave the cups almost caught fire(!)
  • Beeswax produces a nice clean smell when burnt and looks good too. Also using old wax from mostly used candles is a great idea
  • Sometimes your candle may develop what is known as a 'sink hole' when the centre of the candle dips whilst drying. I looked this up to see what causes it - apparently it is down to temperature - tips included using a thermometer and heating up the glass votive 
I hope these tips help - happy candle making xx

Monday, 4 January 2016

Healthy Eating

Like everyone else this time of year, I'm trying to eat healthy and organise my lunch the night/weekend before. If I don't do this, I'll start acting like I'm going to starve and buy prawn cocktail crisps.

This is a 5-day lunch plan which I've followed before - it requires almost no cooking (I buy pre cooked chicken and ready to eat quinoa) and you'll probably have enough ingredients to make a second week's worth of lunches. The only one I never attempt is the chickpea sandwich, which doesn't sound too appealing (and last time I did this, I worked a 4 day week so only need 4 pre-prepared lunches).

Butternut squash going into the oven

Day 2 - a mix of quinoa, squash, pepper, olives, chickpeas, cucumber


Sunday, 3 January 2016

Try, try, try again - Christmas 2015

This is a classic example of when something goes right eventually.

I try to bake some kind of gift every Christmas and 2015's choice was biscotti. Easy to package up into small cute bundles and wouldn't go stale so quickly. I tried this recipe first - not all three flavours but the cranberry and pistachio. We bought the pistachios with their shells still intact so we painstakingly removed them. The instructions are pretty straightforward but I felt a bit intimidated by the stickiness of the dough and having the option of adding as much liquid (in this case, egg) as I saw fit. As I saw fit?! Paul, TELL ME how much egg I need!

The recipe recommends you cut them up (after their first bake) into 2-3 cm slices. Clearly my idea of 2-3cms was huge bricks of haggard biscotti.


First try - cranberry and pistachio bricks


They tasted wonderful but they were so thick and hard, they could stop a conversation dead.

Time for another try - this time, a different flavour and recipe. I tried this one from John Whaite's collection of Christmas recipes and they turned out perfect! So I adapted the recipe and made another batch of cranberry and pistachio. 


Double chocolate and ginger

John Whaite's Biscotti
230g plain flour
20g cocoa powder (not used in the cranberry and pistachio version)
150g caster sugar
125g milk chocolate chips (I replaced these with pistachios)
2 large eggs 
2tbsp milk
50g stem ginger from a jar, finely chopped (I replaced this with dried cranberries)
Essential Equipment
Large baking sheet, lightly greased 


Method
Preheat the oven to 200C/180C fan/gas mark 6. In a mixing bowl, toss together the flour, cocoa powder and sugar until evenly dispersed, then stir through the chocolate chips.
In a small cup, beat together the eggs and milk, and add the chopped stem ginger. Pour this into the dry ingredients and bring together, with your hands, into a fairly smooth dough. This takes a little bit of kneading and force, but it will come together.
Roll the dough into a fat sausage about 28cm/11-inch long, place onto the baking sheet and flatten down slightly. Bake for 25 minutes, then remove from the oven and with a sharp serrated knife, gently but firmly slice the biscotti into thin pieces about 1cm thick. Place these, flat onto the baking sheet and bake for a further 15 minutes.
Remove from the oven and transfer to a wire rack to cool. 


The pistachio and cranberry biscotti going in for their second bake